Originally posted on Real Yoga Toronto with permission to repost.
Interested in yoga but don’t know where to start? Try out these 3 beginner yoga poses that you will soon love to practice! (Variations for limited mobility provided)
One of the biggest favours that you can do for yourself before getting into a regular practice is to get familiar with basic yoga asanas or poses and their alignment. Why? Most yoga classes move at a pretty steady pace and do not always stop to give detailed alignment instructions for each pose. When we’re flowing through different postures quickly, we risk injury if we don’t know how to properly align and engage our bodies in each pose.
In this post we’ll take you through 3 common yoga poses that you’ll see as a beginner, proper alignment for the pose, common mistakes for you to avoid, variations that you can try out, as well as a few of our favourite benefits from each pose.
Feel free to try out these poses as a short and sweet practice, or individually whenever you need them.
Before we jump in, just a friendly reminder that you know your body better than anyone else. If something does not feel good for you, simply don’t do it, or find a variation that suits your needs. Also, please remember that if you have any previous existing injuries or illnesses then you should always consult a trusted physician before engaging in any kind of new physical activity.
Now without further ado, let’s get moving!
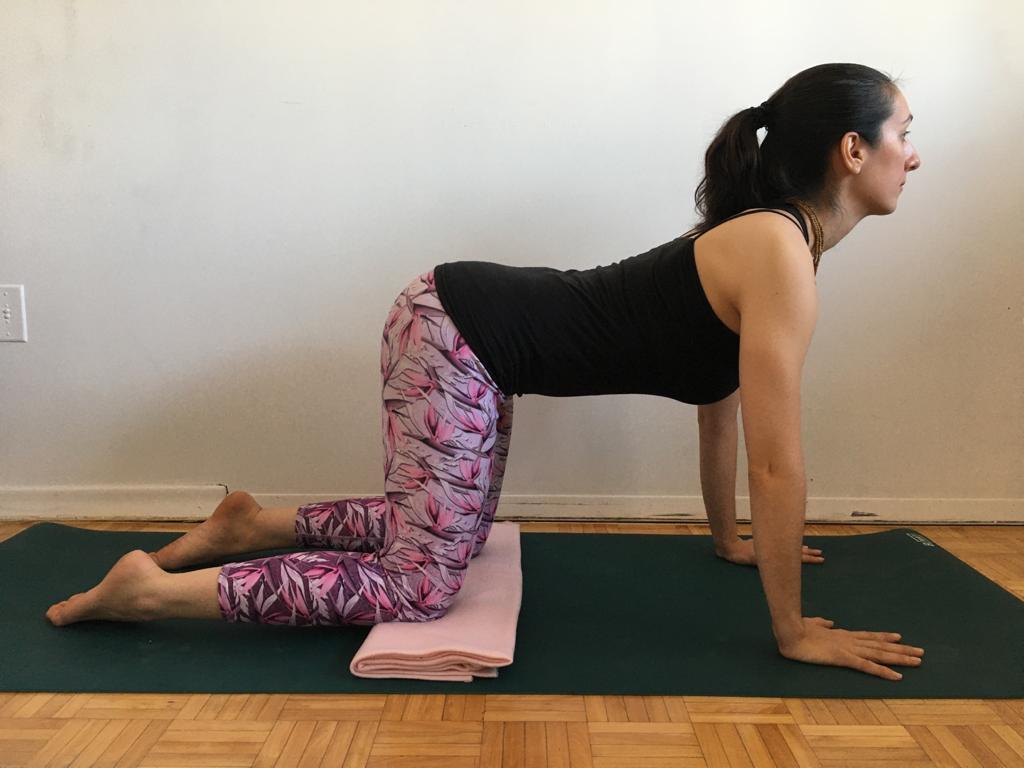
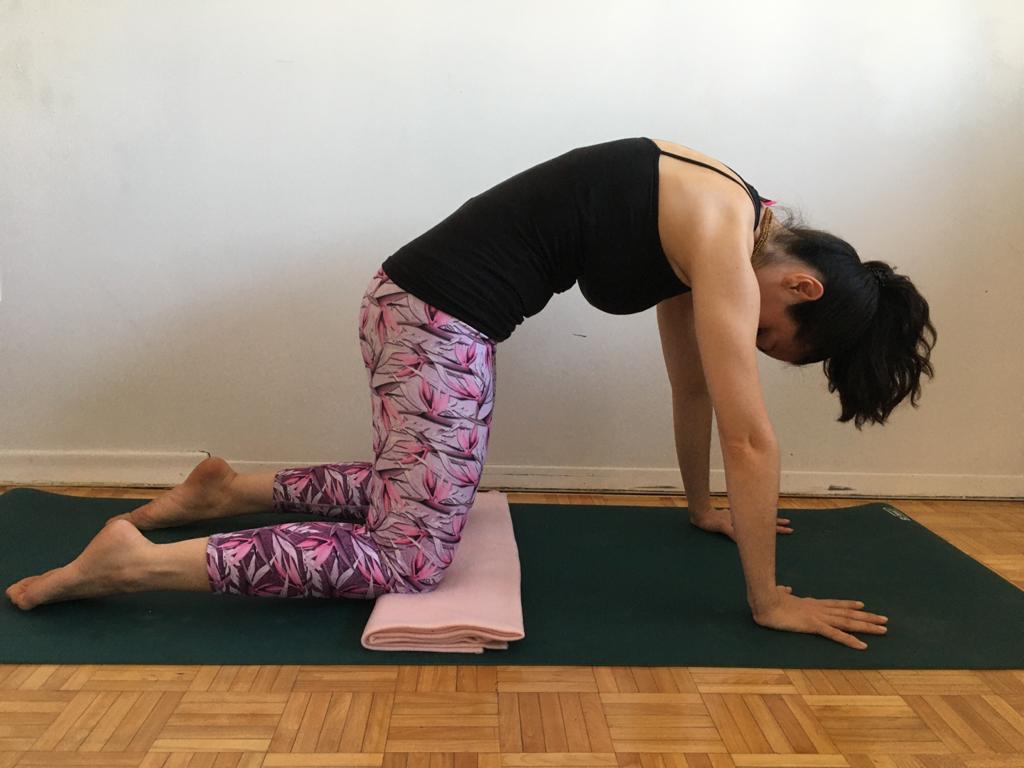
Pose #1 – Cat/Cow Pose (Marjaryasana/Bitilasana)

To get into the pose get down on your hands and knees. Make sure that your wrists, elbows and shoulders are in line with each other (hands should be shoulder-distance apart), and your knees should be hip-distance apart.
Engage the abdomen by sucking the belly button back towards the spine and make sure you’re not dumping your belly towards the floor. There should be a straight line from the crown of your head all the way down to your tailbone and your gaze should be towards the floor.
Keep a micro-bend in your elbows and draw them inwards towards your ribs to avoid any hyper-extension in the elbow joint. Lastly, draw your shoulder blades towards each other on your back. This starting posture that we’ve created here is commonly referred to as table-top pose (bharmanasana).
To start cat-cowing first start your inhale and begin to draw your gaze and sternum forwards. Then on the exhale, press your hands into the mat and start to round your spine like an angry cat. Take your gaze towards your belly button.
Repeat for 3-5 rounds using your entire inhale to get into cow pose (gazing forwards) and the entire exhale to get into cat pose (gazing towards your belly). Be sure to keep your abdomen engaged by drawing your belly button back towards your spine.
Mistakes to Avoid
Try to start the movement from your upper back rather than your lower back. Starting the movement from the low back will feel like you’re just sticking your butt out and recoiling it which doesn’t feel so good on the low back. Instead, keep your abdomen engaged and focus on opening and closing the chest.
Variations
If you have sensitive knees, we suggest putting a folded blanket underneath them for extra support (see images).
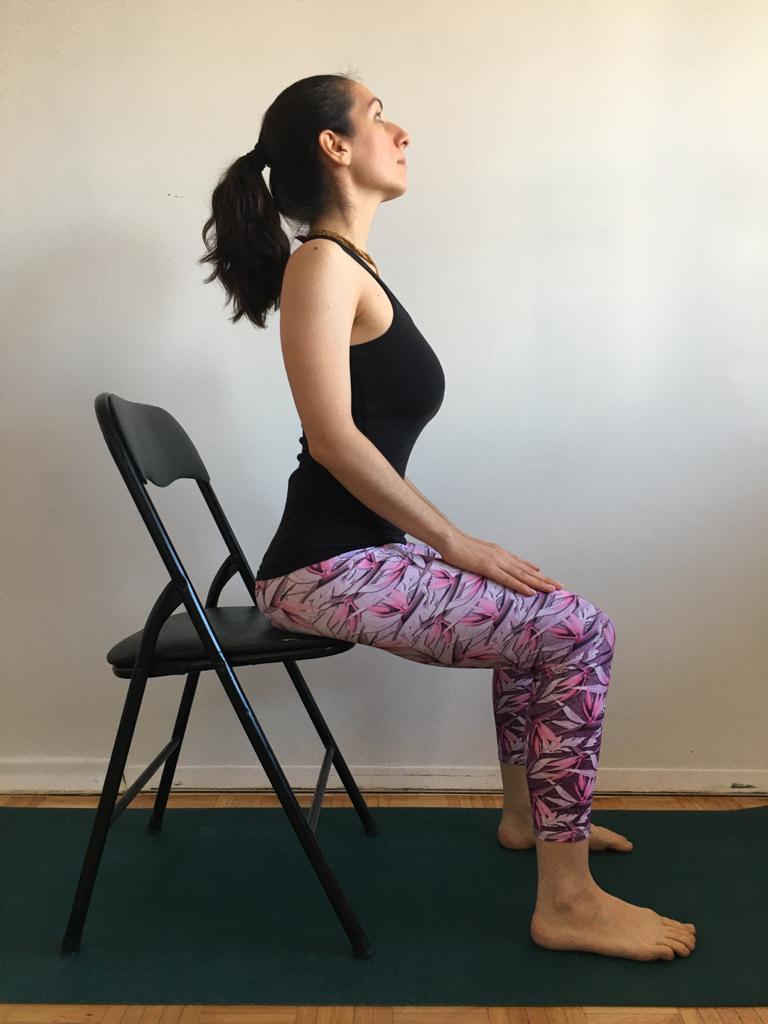
If being on your hands and knees is difficult for you due to mobility restrictions, then you can either sit cross-legged on the floor or even seated in a chair with your feet planted on the floor and practice in this way.
Start with your hands on your thighs, draw your belly button towards your spine and look forwards. On the inhale lift your sternum and your gaze upwards to about a 45-degree inclination. Avoid looking at the ceiling directly above you as this will only crunch the back of your neck and create strain.
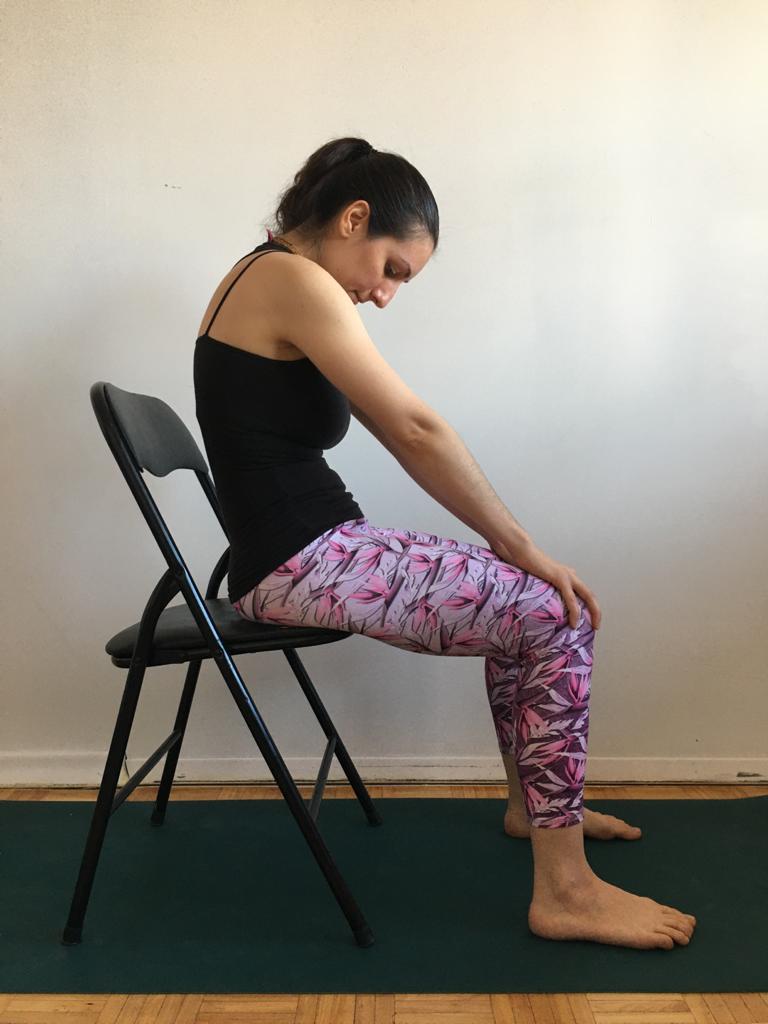
On the exhale, begin to slide your hands towards your knees and round your spine, taking your gaze to your belly. Keep your belly button drawn back. Again, you can repeat this cat/cow sequence for 3-5 rounds (see images above).
Why we love the pose
After sitting at a computer all day, or craning our neck downwards as we check our cell phones, or simply from slouching and practicing poor posture, this cat/cow sequence gives a much-needed relief for the upper back, shoulders and neck.
Pose #2: Downward-Facing Dog Pose (Adho Mukha Svanasana)
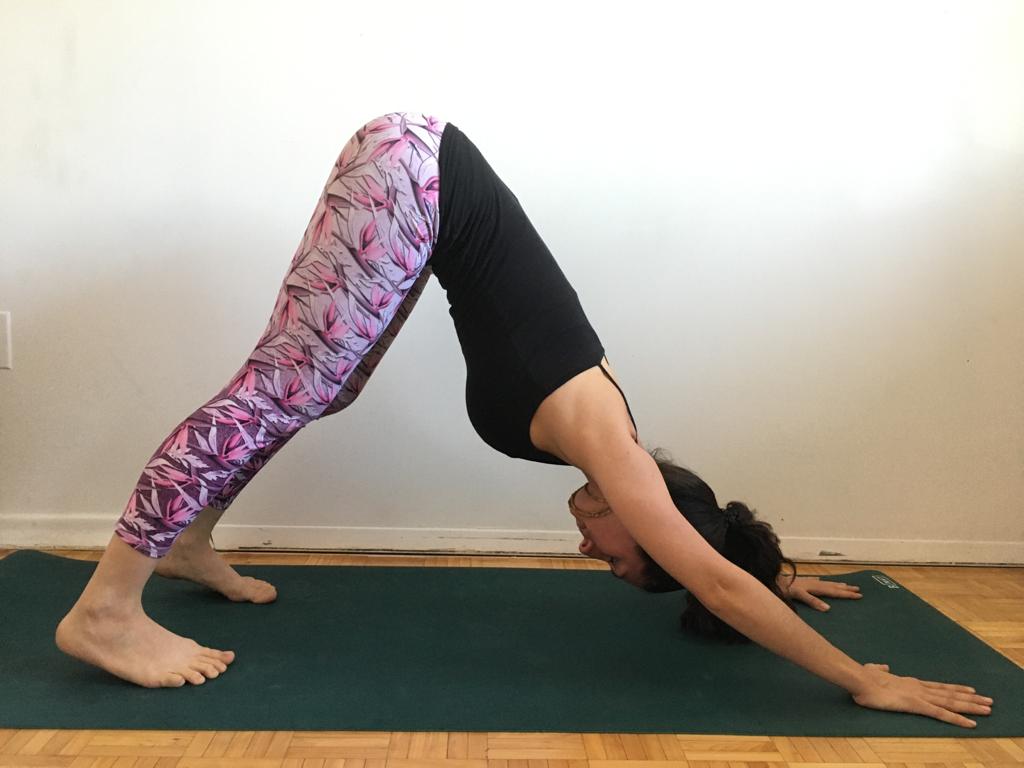
From our table-top pose draw your belly button back towards your spine, tuck your toes under, press your hands into the mat, and lift your hips up and back behind you. If it’s your first downward dog of the day we recommend pedaling out your feet a bit to warm up your hamstrings.
After pedaling out your feet, find a long, straight spine by lightly bending your knees and pressing into the mat with all ten fingertips, finger mounds, and the heels of both hands. Draw your tailbone up towards the sky.
Remember to keep a micro bend in the elbows and to draw them in slightly towards the ribs. This will prevent you from dumping weight into your elbow joints. Then, draw your shoulder blades back and down the back so that we’re not eating our neck with our shoulders. Make sure your ears are in line with your biceps.
Finally, start to straighten your legs by pressing your heels down towards the floor. Be sure to maintain that nice, straight spine that we created when the knees were slightly bent.
It’s not necessary for your heels to touch the floor, our goal here is to stretch the backs of the legs so if you feel that stretch while your heels are still in the air that’s totally fine.
Note: If I were teaching myself, I would probably tell me to walk my feet back one or two steps in this image.
Mistakes to avoid
Slippery mats. Downward dog is a very difficult pose to properly engage in if you’re sliding forwards on your mat. We recommend placing a towel down on the mat to avoid slipping, or investing in a better-quality mat. Click here for a guide to choosing a yoga mat.
Slippery mats usually lead to bringing the torso forward in space to compensate. What we want though is to press the hands into the mat so that we can bring the hips and torso back and create an up-side-down V-shape with our bodies. We can only do this if we can have a non-slip surface for our hands.
Variations
You can practice this pose with a wall or sitting down in a chair as well. If you’re using a wall start by standing with your feet hip-distance apart. Face the wall that you will be using and place your hands on the wall in front of you at shoulder height.

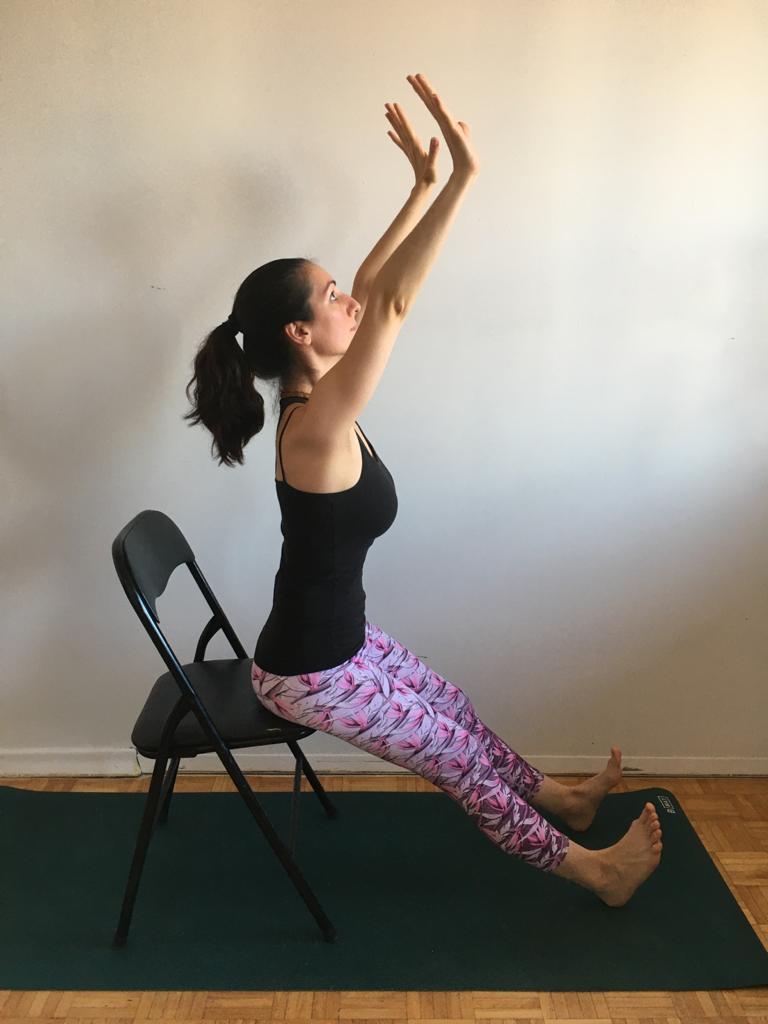
Start walking your feet back in space and at the same time walk your hands down the wall, always keep them at shoulder height. Stop walking when you have created a box shape with your body and the wall. Then look down so that your ears are in line with your biceps. Remember to draw your belly button back.
To practice this pose while sitting down, start with a straight spine and your feet planted on the ground. If it’s safe, sit on the edge of your chair and start to straighten your legs forwards with your toes facing upwards. Your heels should be planted on the floor. Then lift your arms up at a 45-degree angle from your torso and gaze in between your hands.
Why we love the pose
A great way to stretch and engage the entire body. Downward dog helps strengthen the arms and legs and at the same time provides a juicy stretch all around.
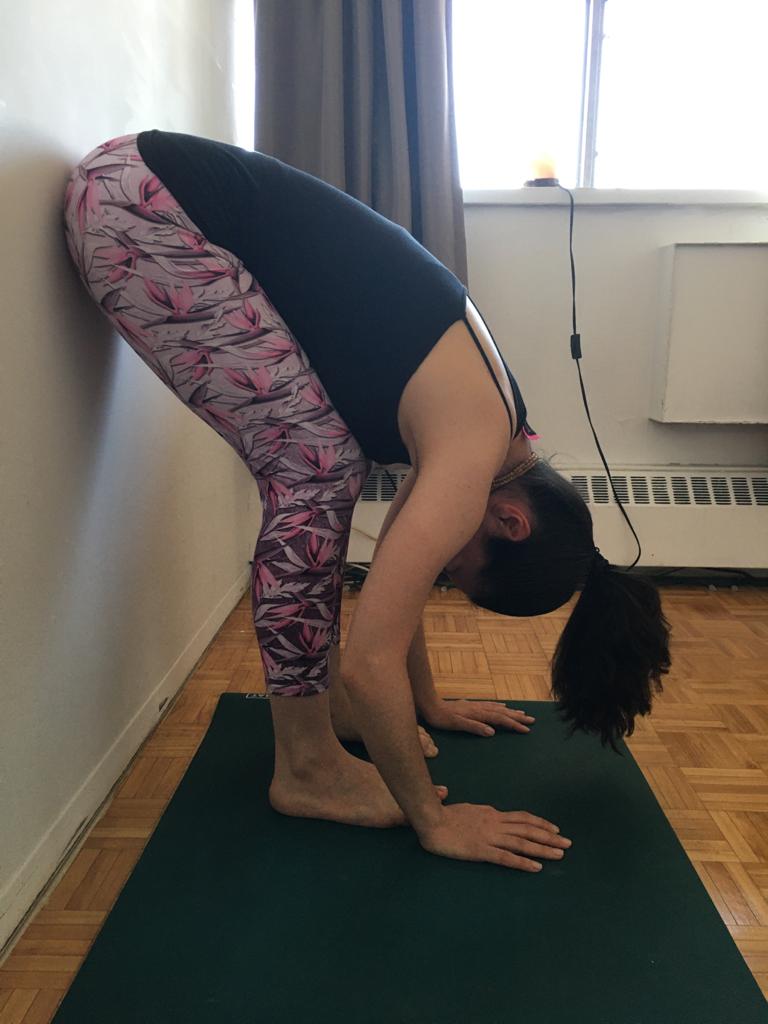
Pose #3: Forward Fold (uttanasana)
From downward dog, gaze in between your hands and either step or walk your feet in between your hands. You knees can be bent here as you release the crown of your head towards the floor. Then see if you can lengthen the backs of your legs as much as your body permits, and lift your tailbone up towards the ceiling.
You can also start from standing in a neutral pose, feet hip-distance apart and arms by your sides. Slowly roll down through the spine starting from the crown of the head. Roll down only as far as your body allows.
If your hands don’t reach the floor you can also take two yoga blocks or hard-cover books and place them under your shoulders underneath you. Place your hands on these blocks to bring the floor closer to you.
Release the crown of your head down towards the ground and dangle here like a rag doll. You want to slowly engage the backs of the legs by beginning to straighten the knees and draw the tailbone up towards the sky.


Eventually, we want to bring the torso closer to the thighs and the hands closer to the floor. But this takes time and practice, so be kind to yourself and go at your own pace.
Mistakes to avoid
Forgetting to engage the abdomen. Just because we’re folding forward over the belly does not mean that we should stop engaging. Remember to draw the belly button back towards the spine. This same action is what will help draw the torso closer to the thighs and help us go deeper in the pose.
Variations
You can try forward-folding with a wall or in a chair as well. For the wall version, stand with your feet dip-distance apart and with your back against the wall. Start to roll down through the spine but keep your glutes against the wall. In this version you can keep your knees slightly more bent and has a more restorative effect to it.
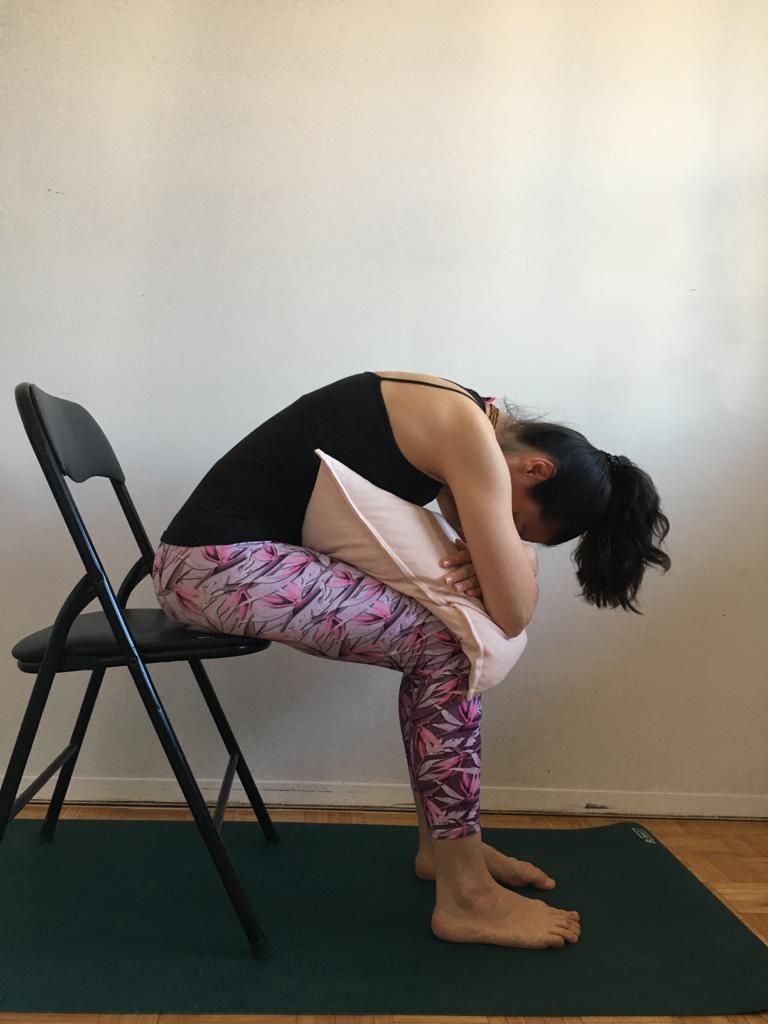
You can also try this pose while sitting in a chair. Start with a straight spine and both feet planted on the floor. Slowly begin to roll down through the spine as far as your body permits. In this version try placing a large pillow or blanket on your thighs for extra support for your torso as you fold forward.
Why we love this pose
After a long and stressful day this pose feels like such a delicious way to let it all go. There’s no doubting the calming effects that come with folding forward. Be sure that you don’t have any physical conditions that are counter-indicative of these sorts of postures (i.e., glaucoma, blood pressure issues, etc.). Always be sure to consult your family doctor to see what is or is not favourable for your health.
To finish up your practice, slowly begin to roll up through the spine vertebra by vertebra, the last thing to come up should be the head. Breath here for a moment and take a moment of gratitude and peace before carrying on with your day.
Typically we spend anywhere from 3-5 long deep breaths in each static pose. Be sure to keep your mouth closed while breathing and to take long and smooth inhales and exhales through the nose.
These poses are so easy, even your dog can do them!
Thanks for reading our post! The Workplace Wellness Blog is here to share tips and resources to help you be the best you can be for yourself, your social circle, and your home and work community!
Found this post helpful? Subscribe down below to be notified each time we share a new post!